Ok so this may sound a little bizarre…..but stay with me! I promise you this is worth it!
Like most crafter’s I’m a bit of a hoarder and had (over many year’s of course) collected quite a stash of empty Ferrero Roche boxes. Obviously not all eaten by me, ahem. You can use any similar box for this, anything made with hard and clear plastic (which incidentally is quite difficult and costly to re-cycle) will do!
Pondering like I do of things to make I came across these boxes and had a think. This is what I came up with. Turning an empty plastic box into a night-light (my husband nearly had a cerebral meltdown when I tried to explain this) is obviously the answer! So…if it’s difficult to explain…..I thought I’d show you!
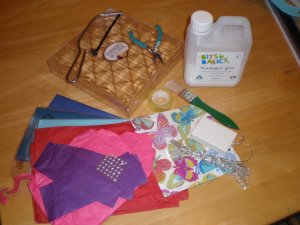
So lets do this Blue Peter stylee……have you got your equippment ready?
You will need:
PVA glue mixed with water (I do this quite thick, add a drop at a time!)
Paintbrush
Small pliers (jewellery pliers are ideal)
Junior hacksaw
Plastic box (Ferrero Roche is you’re a chocaholic like me!)
Fairy lights (these can be battery powered or mains, it’s up to you. Mine have 10 bulbs for a box this size, they MUST be one’s that DON’T HEAT UP!!)
Cello-tape
Crepe paper suitable for de-coupage.
1) Cut hole in box for wire.
You will need your hacksaw and pliers for this bit! Do this into the side of the box that will be the BACK, ie the bumpy side. Draw two lines about half a centimetre apart and about a centimetre long. Cut down along the lines with the hacksaw (WARNING this is very noisy, I found it easier to just pull the saw backwards a few times rather than using an actual sawing motion!) Once you have cut along both lines, bend and snap off the bit in the centre with your pliers. This should leave a nice space for your fairy-lights wire.
2) Choose your background
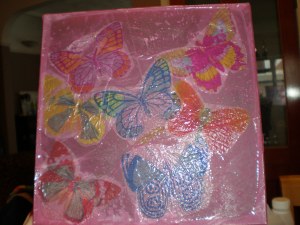
I have chosen pink for my background, but you can be creative! Remember to do this on the flat side of the box without labels on as they would show through your design. I found the paper stuck better if you paste the glue all over the front and halfway down the sides of the box and THEN add your crepe paper. Once you’ve placed the paper on then paste over again with the glue so it’s all nice and wet! (you have to be gentle so as not to tear the paper) Fold all round the sides with the brush but ensure the paper doesn’t go over the lip of the box otherwise it’ll affect the way it closes. You can be as careful or quick as you like, most of the wrinkles dry out flat once it dries, besides I think the odd wrinkle adds character! 😉 x
3) GET CREATIVE!!
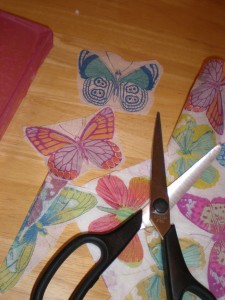
I chose to use an old serviette (I had these at my wedding so it was great to use them in a creative way!) with pretty butterflies on it. Cut out your design and get sticking!
I have randomly placed the butterflies on the box (I don’t do symmetry!) as I wanted it to look like they were just landing or alighting in a little group! Don’t worry about cutting out things exactly, as you’ll see below the colours blend together as you’re using such thin paper:
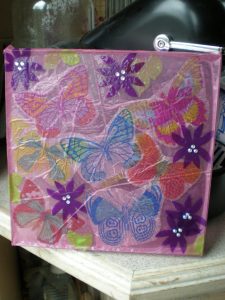
I wanted to add a bit more to this, to really bring out the colours of the butterflies and add a little colour:
This is the end result!! I have added some dark purple flowers, green leaves and diamante stickers to add a bit of sparkle! They’ll also help to reflect the light once you switch it on at the end.
4) Fix in the fairy lights.
Literally GO NUTS with the cello-tape for this bit! You don’t want these moving once the box is sealed! If your light is going into a child’s bedroom where it could be knocked I would maybe use something like a glue gun for extra security. BEFORE you stick your lights make sure to consider where you want them in relation to your design. I am sticking them to the inside to the BACK wall of the box, this will give a diffused light effect. If you want a brighter light effect then attach the lights to the FRONT wall of the box (just behind your design) This is good if you have a design with stars…as you’ll see at the bottom of this page! Remember you want the lead to fit into the hole so the first light on the row must be nearest to the hole.
5) THE EXCITING BIT!!
TURN IT ON!! This is the best pic I could get so you’ll have to trust me on how pretty this really looks in a darkened room! I think this one may end up in MY bedroom lol!!
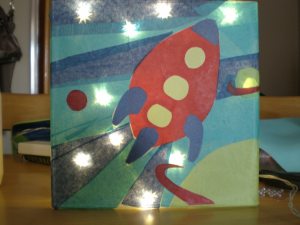
Here’s another I made earlier (told you we were doing this Blue Peter stylee!) using the lights closer to the design for a stronger brighter light:
This I made for my son and he loves it!!
To finish your night-light either glue or tape all the way around the box so it’s securely fixed shut. Ensuring of course that the plug/battery pack is outside!!
I really hope you enjoyed this tutorial and I really hope you’ll give it a go yourself!! If you would like to send me a pic of one you’ve made I’d be delighted to see it!
You can find me most days on my FB page at Crafty Love so share your pic on my wall!
http://www.facebook.com/pages/Crafty-Love/167446303366034
If you enjoyed this post PLEASE COMMENT!! Thanks so much 🙂 x





lovely idea! and welcome to the blog world!!
Thanks so much! I’m a bit nervous as I’ve never ‘blogged’ before but have always wanted to! x
Wow – truly brilliant!!! Any spare boxes? 😉 I have been blogging for about 3 weeks and am a tad addicted! Shall I follow you?
Sarah http://sewnowwearefour.blogspot.com
Yes please! I may well have some spare boxes soon…if I do will put them up on FB page. Thanks so much for the lovely comment 🙂 x
I really enjoyed this, I want to make one for my niece! Great idea and nice clear tutorial! (-:
Thank you Megan Morgan, I’d really love to see a pic if you do! You can post it on my wall at my FB page Crafty Love 🙂 x
Thank you!
I did take a lot of time working out each step…making notes as I went! Obviously it was worth it! x
Brilliant!! Any spare boxes? 😉
Ha! Yes but I have ideas for them all….however I will help you out by eating all the chocs if you do buy one! x
Hi, lovely blog. Already thinking of a design for one to put in my youngest sons room.
Blogging is great, you will soon be addicted. X
Thanks! I can feel the addiction taking hold already…I meant to go to bed an hour ago! lol x
OMG there are amazing!! So gonna make one or two for my room and of course the boys will have to have one each 😉 bring on the craftiness!! Thank you so much for sharing this with us all!!
Ah thanks hon that’s really nice! Thanks fro your support! 🙂 x
I love the rocket one. My kids would love to have a go at this. Would look lovely with a candle behind as well.
I agree! Freddy loved it when he saw it! Shame I haven’t got a daughter to give the butterfly one to…oh well I’ll just have to keep it lol! x
Wow what a brilliant first blog!
Clear and easy to follow instructions and a fab end product to be proud of.
Well done
Helen x
Thanks so much! I’m hoping to follow it with many more! x
I Love this – fab creativity – will be looking for plastic boxes around the house now! I LOVE special llighting so will definitely be trying this out! Thank you for sharing 🙂
Thanks Kate, I’m so glad you liked it! I am the same….I love anything that glows or sparkles! x
I love this creative idea. They look so beautiful.
Thanks! They look so much better in real life too! It’s always hard taking photo’s of lights and candles and things. Thanks for reading it 🙂 x
Alice, I LOVE it. it had also given me even more reasons to go out and buy chocolates for myself. I guess i’ll just have to force myself to eat them so that I can use the box… it’s a sacrifice I’m willing to make.
Love the whole idea. How do you know if you’re buying fairy lights that don’t heat up though? Not sure they say anything about that on the ones you get in France.
Reallly looking forward to your next crafty blog. xx
I’m not sure but I think that most of the new ‘led’ type ones are fine, it’s the old style (where if one goes they all do type) that I wouldn’t want to use. Thanks for the lovely comments. I am currently thinking of what to do next! 🙂 x
Wow i love them – what a brilliant idea!!!!
Thanks hon! 🙂 x
Would you like me to do a blog on how to make a paperbag or cardboard container into a nightlight? I think that’d compliment this one brilliantly. Great for people wanting to make their own wedding lights. Loads of ideas floating around my noggin at the moment. Can’t wait til the easter hols. xxx
Lovely yes please!! 😀 x
exellent article well done ! loved the idea and am off to copy lol thanks a lot decorating on a budget this just saved me a small fortune !!
Lovely I’m so pleased! If you’d like to follow me I’ve got loads more up-cycling ideas coming up and that way you’ll get an email when I post something new. So you won’t miss anything! Next up…..up-cycled draught excluders! 🙂 x
Fabulous craft idea and great first blog. I’ve just started blogging and find it very creative. It is difficult sometimes to get started but a friend who writes a lot gave me some great advice. Just start with the first idea that comes into your head and “talk” as if you were speaking to a mate. It is easy to go back and change what you’ve written.
Keep it up, I look forward to following you. Sharon
That sound’s like great advice! Love your contribution thank you, will be posting it shortly! 🙂 x
what an unusual and creative use of an old box..like you I save EVERYTHING..drives hubby crazy ;)..love the way different papers make a different finish..I would go for the butterfly style, daughter will want rockets!! should have two boxes knocking around somewhere 😉 thank you!!
Aw thanks Beverley! Hope you enjoy making them and do send me a picture of the finished product! 😀 x